
Mastering VM Startup Policies in Nutanix NCI 7.5
- Taylor Norris

- Jan 26
- 4 min read

If you manage a complex infrastructure, you know that "powering everything on" isn’t as simple as flipping a switch. Your database needs to be up before your middleware, and your middleware needs to be live before the web frontend can accept traffic.
With the release of NCI (Nutanix Cloud Infrastructure) Release 7.5, Nutanix has introduced a robust new feature to handle exactly this scenario: VM Startup Policies. In this post, we’ll dive into what these policies are, how they function, and walk through a step-by-step guide on creating your first dependency chain.
What Are VM Startup Policies?
A VM Startup Policy is a configuration that defines dependency chains to control the order in which Virtual Machines (VMs) restart. These policies specifically kick in during High Availability (HA) events or cluster restart events.
The goal is to ensure application consistency. By grouping VMs into categories and defining rules, you ensure that interdependent VMs come back online in the correct sequence.
Note: VM Startup Policies apply to guest VMs but cannot be applied to Prism Central, Nutanix Objects, or Nutanix Files.
How Priority Works
When an HA event occurs, the system looks at the queue of VMs waiting to start. The precedence order is:
VMs with a Startup Policy: These launch first, adhering to your defined dependency chains.
VMs without a Startup Policy: These start next without any specific order.
Legacy HA Priority: If you have VMs configured with older HA settings, they launch last.
The Mechanics: Conditions and Chains
Before we build a policy, we need to understand the logic Nutanix uses to move from one group of VMs to the next.
1. The Start Conditions
When you create a dependency (e.g., "Web" depends on "Database"), you must define when the system considers the "Database" ready. You have two options:
Power On: The condition is met as soon as the VM is powered on. The system does not wait for the OS or apps to load.
Guest Bootup: This is the "smarter" option for dependencies. It requires Nutanix Guest Tools (NGT) to be installed and running. The system waits until NGT signals that the guest OS has fully booted.
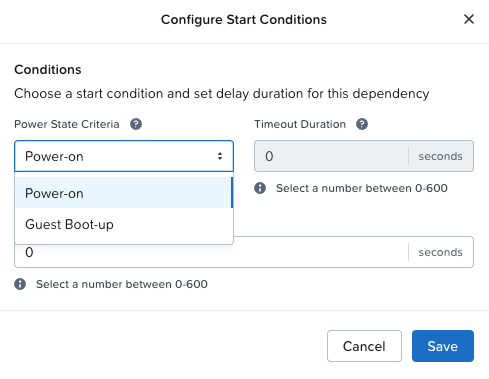
2. Time-Based Parameters
To fine-tune the sequence, you can add buffers:
Delay: A specific wait time after the start condition is met before triggering the next group.
Timeout: The maximum time the system waits for "Guest Bootup."

3. Dependency Methods
You can architect these chains in two ways:
Single Policy: A linear chain (e.g., High Priority -> Medium Priority -> Low Priority).
Application-Based (Multiple Policies): Independent chains for different apps (e.g., a Finance App chain and a CRM App chain). The system evaluates these parallel policies together to determine the total boot order.
Step-by-Step: Creating a VM Startup Policy
Now let's get practical. We are going to create a policy where an Application Group waits for a Database Group to boot.
Prerequisites:
You are logged into Prism Central.
You have already assigned Categories to your VMs (e.g., Cat_DB and Cat_App).
Limit Check: You can have up to 20 policies per Prism Central instance, with up to 6 dependency levels per policy.
Step 1: Navigate to VM Startup Policies
Log in to Prism Central.
Use the Application Switcher to select Infrastructure.
Navigate to Compute > VMs in the navigation bar.
Click the Policies tab dropdown menu and select VM Startup Policies.

Step 2: Initialize the Policy
On the summary view, click the Create VM Startup Policy button.
Name: Enter a descriptive name for your policy.
Description: (Optional) Add details about which application or VMs this controls.


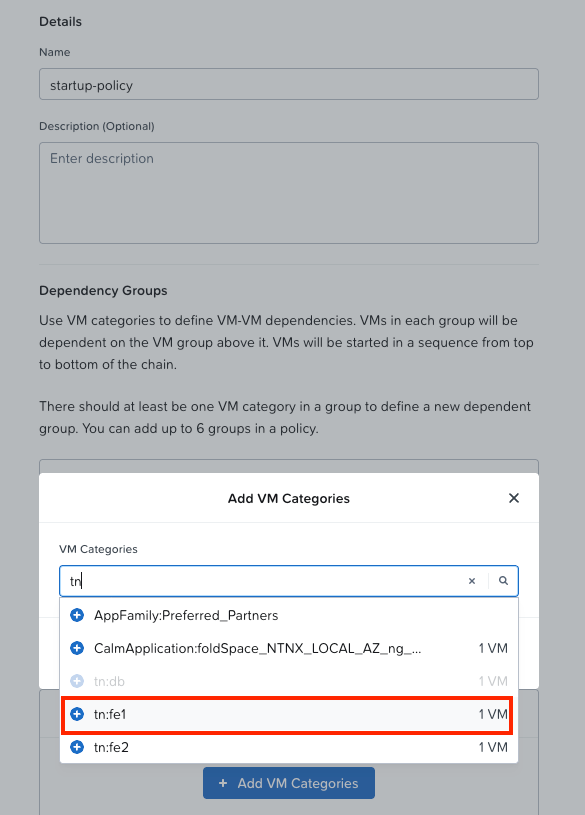
Step 3: Define Dependency Groups
This is where you build the chain. The sequence runs from the top of the list to the bottom.
Click "Add VM Categories"

Type the name of your first category (e.g., TN_DB). The system will display matching categories; select the correct one.

Click "Save"

Click "Configure Start Conditions"

Choose between Power On or Guest Bootup.

Set a Delay duration if you want a buffer period after the DB boots before the App starts.

Click "Save"

Add the Dependent Group: Add your next category (e.g., tn:fe1) below the first one. This defines that tn:fe1 depends on the group above it.
Click "Save"

Click "Configure Start Conditions"

Choose between "Power On" or "Guest Bootup"
Click "Save"
Add the Dependent Group: Add your next category (e.g., tn:fe2) below the second one. This defines that tn:fe2 depends on the group above it.


Click "Save"

Step 4: Finalize
Review your chain. Ensure the logic flows correctly (Top starts first -> Bottom waits for Top).
Click "Create"

The compliance status with go into a "Pending" state.

Once complete, the compliance status will change to "All Compliant" and you have successfully created you VM Startup Policy.

Summary
VM Startup Policies in NCI 7.5 provide the granularity needed for modern, multi-tier applications. By leveraging Categories and NGT, you can ensure that when your cluster recovers from an event, your applications come back online automatically and correctly.
Additional Links AHV Admin Guide VM Startup Policies Test Drive


Comments