
Optimizing Nutanix Infrastructure with Intel Speed Select Performance Profiles
- Taylor Norris

- Nov 25, 2024
- 5 min read
Nutanix infrastructure, renowned for its simplicity and scalability, becomes even more versatile when paired with Intel Speed Select Technology – Performance Profiles (Intel SST-PP). This integration enables Nutanix environments to be finely tuned for a wide range of workloads, offering unmatched flexibility and performance efficiency.
This blog post delves into how Nutanix can leverage Intel SST-PP on select platforms with Intel Sapphire Rapids and Emerald Rapids processors, providing a step-by-step guide to configuring and managing these settings for your infrastructure. Additionally, we’ll demonstrate how to select performance profiles directly in Nutanix Sizer to ensure optimal resource planning for your workloads.

What is Intel SST Performance Profiles (SST-PP)?
Intel SST-PP is a feature that allows administrators to customize CPU performance by selecting from predefined profiles. These profiles adjust the number of active cores, their frequencies, and thermal design point (TDP).
As Intel explains:
"Intel® Speed Select Technology – Performance Profile (Intel® SST-PP) provides customers with multiple processor configurations within a single device, allowing the customer to select between an optimal balance of core count, base frequency, and Thermal Design Point (TDP). Intel® SST-PP is available on select processors and can be easily integrated across the network. This allows for improved CPU SKU consolidation by using one SKU for multiple workload and application types. As the workload requirements change over time, a more appropriate Intel SST-PP configuration can be selected without replacing the CPU, leading to improved server utilization."
This capability offers flexibility and efficiency, ensuring IT administrators can meet diverse workload demands while optimizing hardware investments.
How To Size for Intel SST-PP with Nutanix Sizer
Before we look at how to configure Intel SST-PP on a Nutanix node, let's look at how to size for Intel SST-PP in Nutanix Sizer, including selecting CPU Profiles.
Let’s assume we’ve already imported or created our workloads and are now on the Solution tab in Nutanix Sizer.
In the Hardware Summary Click "Modify"

Select the "Manual" tab

Click the "kebab" menu and select "Edit Model"

Select a "CPU Profile"
Profile 0: design uses all 48 cores from the above selected CPU Type
Profile 1: design uses 40 total cores from the above selected CPU Type
Profile 2: design uses 32 total cores from the above selected CPU Type
Note: If the CPU Profile box is not displayed, then the selected cpu/system may not support them.

Click "Save"

Click "Apply"

Hover over the information icon beside your HW model (NX-8170-G9 in this case)
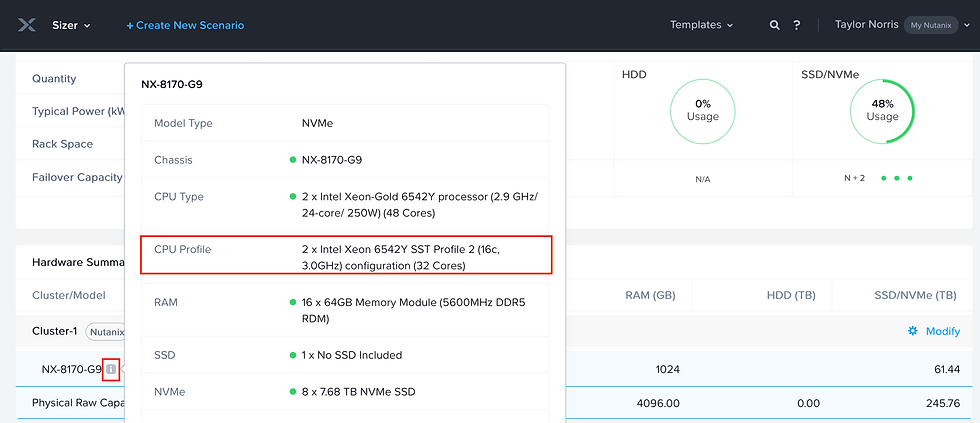
Notice that since we selected Profile 2, Sizer considers 32 cores per cpu.

Now that we've seen how to design the CPU Profiles, let's look at how to configure Intel SST-PP settings for a Nutanix node.
Nutanix Supported SST-PP Settings
Nutanix supports the following Intel SST-PP settings:
Auto (Default): The core count and CPU frequency align with the processor’s default specifications.
Level 0: All cores are enabled, utilizing the maximum thermal design power (TDP).
Level 3: Balanced performance and power consumption, ideal for mixed workloads.
Level 4: The lowest core count with the highest base frequency and the lowest TDP, optimized for latency-sensitive workloads.
Note: New systems are shipped with the default Auto profile selected, but administrators can customize the profile based on workload requirements.
Nutanix and Intel SST-PP: Key Considerations
Persistent Changes: SST-PP profile changes must be made before imaging the system using Nutanix Foundation. Changes after imaging can lead to unpredictable behavior or possible loss of data.
BIOS Version Requirements: Ensure the BIOS version is at least Ex30.101 for SST-PP support.
LCM Dependency: To make BIOS settings persistent, use LCM 3.1 or later.
Managing SST-PP on Nutanix: A Step-by-Step Guide
1. Configuring Intel SST-PP Through IPMI
Administrators can configure SST-PP profiles remotely using the Intelligent Platform Management Interface (IPMI).
Steps:
Use the curl command to specify the SST-PP profile:
[nutanix@localhost ~]$ curl -X PATCH --insecure --user user_id:password "https://IPMI_IP/redfish/v1/Systems/1/Bios" -d "{\"Attributes\": {\"IntelSST-PP#3CD8\": \"SST_setting\"}}"
Replace:
user_id and password with your IPMI credentials.
IPMI_IP with the node’s IPMI address.
SST_setting with one of Auto, Level0, Level3, or Level4.
Restart the node to apply the changes:
[nutanix@localhost ~]$ curl -X POST --insecure --user user_id:password \ "https://IPMI_IP/redfish/v1/Systems/1/Actions/ComputerSystem.Reset" \
-d "{\"ResetType\": \"ForceRestart\"}"
Replace
user_id and password with your IPMI credentials.
IPMI_IP with the node’s IPMI address.
Verify the core count with the following command:
[nutanix@localhost ~]$ curl -X GET --insecure --user user_id:password "https://IPMI_IP/redfish/v1/Systems/1/Processors/processor_id"
Replace
user_id and password with your IPMI credentials.
IPMI_IP with the node’s IPMI address.
Replace processor_id with the CPU ID.
Image the node using Nutanix Foundation
Verify the settings with:
[nutanix@localhost ~]$ lscpu
Architecture: x86_64 CPU op-mode(s): 32-bit, 64-bit Byte Order: Little Endian CPU(s): 96 On-line CPU(s) list: 0-95 Thread(s) per core: 2 Core(s) per socket: 24 Socket(s): 2
2. Configuring Intel SST-PP Through the BIOS
If direct IPMI access is unavailable, you can configure SST-PP via the BIOS.
Steps:
Restart the node and enter the BIOS during the startup process.
Navigate to Advanced > Advanced Power Management Configuration > CPU P State Control.

By default the Intel SST-PP value is set to Auto.
Select the desired SST-PP profile (default is Auto):

Auto: this setting is the default. It means that the core count and CPU frequency are the same as the CPU specification.
Level 0: All cores are enabled with the maximum thermal design power (TDP).
Level 3: Intel Level 1 core profile (balanced performance and power consumption).
Level 4: Intel Level 2 core profile (lowest core count with highest base frequency; lowest TDP).
Save changes and exit the BIOS.
Image the node using Nutanix Foundation.
Confirm the core count with:
[nutanix@localhost ~]$ lscpu
Architecture: x86_64 CPU op-mode(s): 32-bit, 64-bit Byte Order: Little Endian CPU(s): 96 On-line CPU(s) list: 0-95 Thread(s) per core: 2 Core(s) per socket: 24 Socket(s): 2
Best Practices for Using Intel SST-PP with Nutanix
Plan Ahead: Choose the appropriate SST-PP profile based on workload requirements before imaging the system.
Validate Configurations: Use tools like lscpu or IPMI to ensure the configured core count matches the expected profile.
Update Firmware: Keep BIOS versions updated to meet the minimum requirements for SST-PP.
Conclusion
Intel SST-PP offers a powerful way to optimize your Nutanix infrastructure for specific workloads, providing the flexibility to adjust performance and power consumption dynamically. By configuring these settings through IPMI or BIOS and leveraging Nutanix Foundation, administrators can ensure that their infrastructure is primed for efficiency and performance.
Whether you’re running latency-sensitive applications or balancing mixed workloads, Nutanix with Intel SST-PP gives you the tools to build an environment that meets your unique needs.
Ready to optimize your Nutanix environment? Explore these configurations today and unlock the full potential of your infrastructure!
Helpful Links


Comments