
Unlock the Power of Nutanix Playbooks: Automating SQL DB Backups with PowerShell
- Taylor Norris

- Oct 4, 2024
- 3 min read
Automation is key to streamlining IT operations, and Nutanix Playbooks are a great way to make that happen. With Playbooks, you can define a series of actions that can be triggered on demand or by specific events, making repetitive tasks seamless and error-free. In this post, we will dive into what Nutanix Playbooks are and provide a step-by-step guide for creating a playbook that runs a PowerShell script against a VM to back up a SQL database called “accounting.”
What Are Nutanix Playbooks?
Nutanix Playbooks provide a way to automate common tasks in your IT environment. They allow you to define workflows made up of sequential actions, like taking snapshots, running scripts, and sending notifications. With Playbooks, you can simplify the complexity of managing a diverse infrastructure by building reusable workflows that integrate with your virtualized environment.
Let's get started!

Step-by-Step Guide: Creating a Nutanix Playbook to Backup SQL Database
Step 1: Write the PowerShell Script
Write the PowerShell script that will back up the SQL database. Here’s an example script you can use:

This script backs up the “Accounting” database to a .bak file. in the default backup location.
Copy and paste this PowerShell script into the "C:\scripts" folder on the SQL VM.

Step 2: Access Nutanix Prism Central
Open your browser and navigate to your Nutanix Prism Central instance.
Enter your login credentials and sign in.

Step 3: Navigate to Playbooks
In the drop-down menu, select "Intelligent Operations".

Select "Playbooks".
You will be directed to the Playbooks dashboard, where you can see existing playbooks and create new ones.

Step 4: Create a New Playbook
Click the "Create Playbook" button.

Step 5: Define the Trigger
Triggers define when the playbook will run. You can choose between manual triggers, event-driven triggers, time-based, etc.
For this guide, select "Manual Trigger" so you can run the playbook on demand (You can also schedule it for a specific time, such as daily backups).

Step 6: Add an Action
Click "New Action" to define the task the playbook will execute.
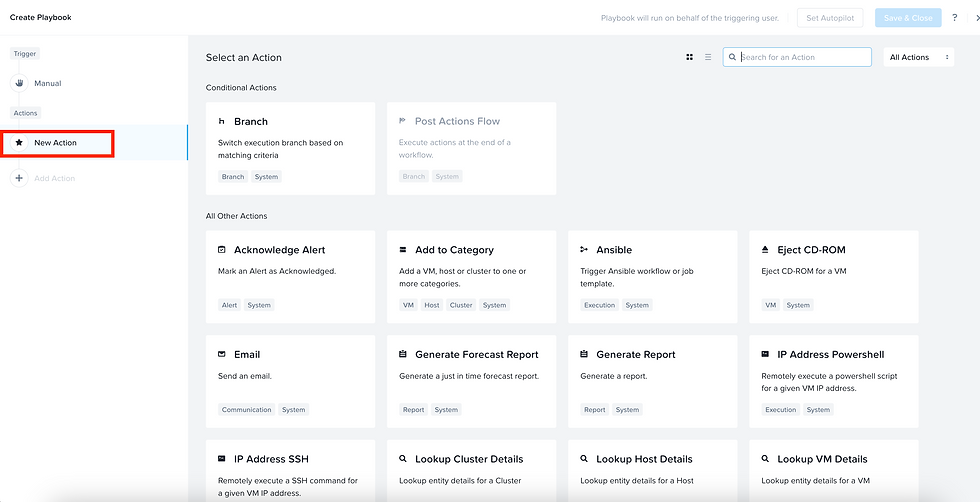
From the available action types, select "VM Powershell".

Select your "target vm", enter a "username and password" for the VM, then enter the "path" to your Powershell script on your VM.

Step 7: (Optional) Add Notifications
To make your playbook even more robust, you can add an action that sends an email notification.
Click “New Action”.
Select “Email”.

Specify the "recipient", "subject", and "message" for backup success or failure.
Click "Parameters" > "Source Entity Name" to add the VM name to the email message.

5. Click "Parameters" > "Current Time" to add a timestamp for the playbook execution time to the email.

6. Click "Save & Close".

Give your playbook a "Name" that reflects its purpose, such as "Backup_SQLDB_PS."
Optionally, you can add a "description" describing what the playbook does.
Toggle “Enabled”.

Click “Save”.

The playbook will display in the list view once saved.

Step 8: Test the Playbook
Navigate to the "Infrastructure Dashboard".

Click "VMs".

Selection "Actions" > "Run Playbook".

Click "Run".

Check your inbox for the email notification.

Navigate back to "Intelligent Operations".
Click "Playbooks".
Verify that the Playbook status is "Succeeded".

Login to your SQL VM and confirm that the SQL database backup file is successfully created on the target VM.

Conclusion
Nutanix Playbooks allow you to simplify complex, repetitive tasks, like running PowerShell scripts to back up your SQL databases. By following the steps outlined above, you can easily set up a playbook that will automate SQL database backups, ensuring your data is securely saved without manual intervention. Playbooks are powerful tools that can enhance your infrastructure automation, making daily IT tasks far more efficient.
Try out Nutanix Playbooks today to unlock the full potential of your virtualized environment.
Helpful Links


Comments